How JEV Makes Decisions About Images: 4 Python Examples
JEV now processes images and adds a Box primitive. Four Python examples cover classification, sharpness scoring, cropping and spotting differences.
I recently wrote an article for TDS (linked at the end) about the new Decision API from OpenAI. In the summary, I compared its capabilities with JEV and stated that although JEV was faster than OpenAI, OpenAI had the advantage of being able to process images.
I also said I didn’t think that was a big enough advantage because I thought JEV would release a system that could process images very soon. Well, it turns out I was correct. In the last couple of weeks, JEV has enabled image processing and introduced a new primitive called Box, which, according to Typesafe AI’s website, is…
… a System One question type for finding where something is in an image. The answer is the four edges of a box around it, as fractions of the image’s width and height.
So, basically, you should use a box when you need to know where something is in an image.
What is JEV?
I won’t repeat the full theory or ethos of JEV here, as I’ve covered that in my previous articles. Suffice it to say that JEV is a new type of AI system developed specifically to make Choice, Yes/No, and other types of decisions about text — and now images.
You define the decision primitive you need to make and supply the content to assess. That might mean deciding whether a customer message is a cancellation request, whether a document contains personal information, or which damage category best describes a parcel in a photograph. The result can then guide the next step in your code, such as routing a request, flagging a document for review or sending a damaged parcel claim for inspection.
In this article, I’ll show you four practical use cases for JEV’s new image processing capabilities.
Prerequisites & Limits
Before using JEV, you’ll need an API key. You can get a key at https://console.typesafe.ai/keys.
JEV has limitations when using images. These are:
- An image must be either in JPEG or PNG format
- The minimum dimension of image width or height is 280 pixels
- The maximum dimension of image width or height is 1568 pixels
- The maximum file size of any individual image is 16 MiB
- The maximum request body size is 32 MiB, including the JSON, base64 text, and multipart framing.
I’m running all my example code on a Jupyter Notebook using Windows. Once you open your Notebook, type and run the following in a cell.
If you’re using a regular Python script, make sure you run the above pip command in your environment first.
Also, run a couple of helper functions. One prompts you to enter your API key, and the others ensure your image is upright and a suitable size for feeding into JEV.
Use case 1 — Classify fabric patterns using reference photographs
Let’s say an online clothing retailer wants to classify uploaded fabric photographs. Instead of describing every pattern entirely in words, provide example images as the answer criteria. In this example, we’ll have 3 example pattern images and one that we want to classify as follows.
 Image by AI
The fabric image we’re trying to classify is the striped one in the top left corner, called to_classify.png.
Here is the code you need for the classification. It’s fairly simple. It asks JEV to classify a fabric image as striped, checked, floral or other by comparing it with reference photographs while ignoring differences in colour, lighting and camera angle. It prints the classification, confidence and option probabilities, then suggests a catalogue tag or flags the image for review if the result is “other” or confidence is below 80%.
And the output?
To check this wasn’t a fluke, I created a polka-dot fabric image and fed it into the code in place of the existing to_classify.png image.
 Image by AI
Here’s what came out of that run.
Use case 2 — Score the sharpness of a product photograph
Before accepting a product photograph, assess whether the main item is sufficiently sharp. This example evaluates one specific dimension — focus — rather than combining lighting, composition and sharpness into one vague quality score.
I’ll use two images of the same object — a teapot. The one on the left is sharp (product_photo_1.png), and the other is slightly blurred (product_photo_2.png). Here are the input images.
 Image by AI
To process these two images, we can use code like this. It sends both photographs to JEV in one request, asking it to assess each image separately for an identifiable main product and score its sharpness from 0 to 3 while ignoring intentional background blur. It prints the results and uses visibility, confidence and sharpness thresholds to recommend a clearer photograph, manual review, a retake or a pass.
And this is the output we get.
Use case 3 — Locate and crop a shipping label
For our third use case, we’ll use the new Box primitive that JEV makes available to identify different parts of an image. JEV answers with a bounding box, the smallest rectangle that contains the target, given as four edges. Each edge is a fraction of the image’s size, measured from the top-left corner. left and right are fractions of the width, and top and bottom are fractions of the height, so the same answer works at any image size.
Suppose a warehouse application receives parcel photographs. We want to find the shipping label and save a cropped image for a later barcode or OCR step.
In fact, for this example, we’ll also use the built-in Noul JEV primitive. This will answer the question, “Does the parcel even have a shipping label?” Only after that’s confirmed do we proceed to try to find the label and crop to it.
Here’s our input image.
 Image by AI
We ask JEV whether it can see a shipping label on the parcel. If it finds one, we ask it to draw a box around the largest visible label.
The code checks two scores before cropping: the probability that a label is present must be at least 90%, and confidence in the box must be at least 80%. When both pass, the code converts the box coordinates to pixels, leaves a small margin around the label and saves the crop as a JPEG. If either score falls short, it reports the uncertainty or flags the photo for manual review.
And here’s the cropped image that was saved as shipping_label_crop.jpg.
 Image by Author
Use case 4 — Spot the difference between two similar images
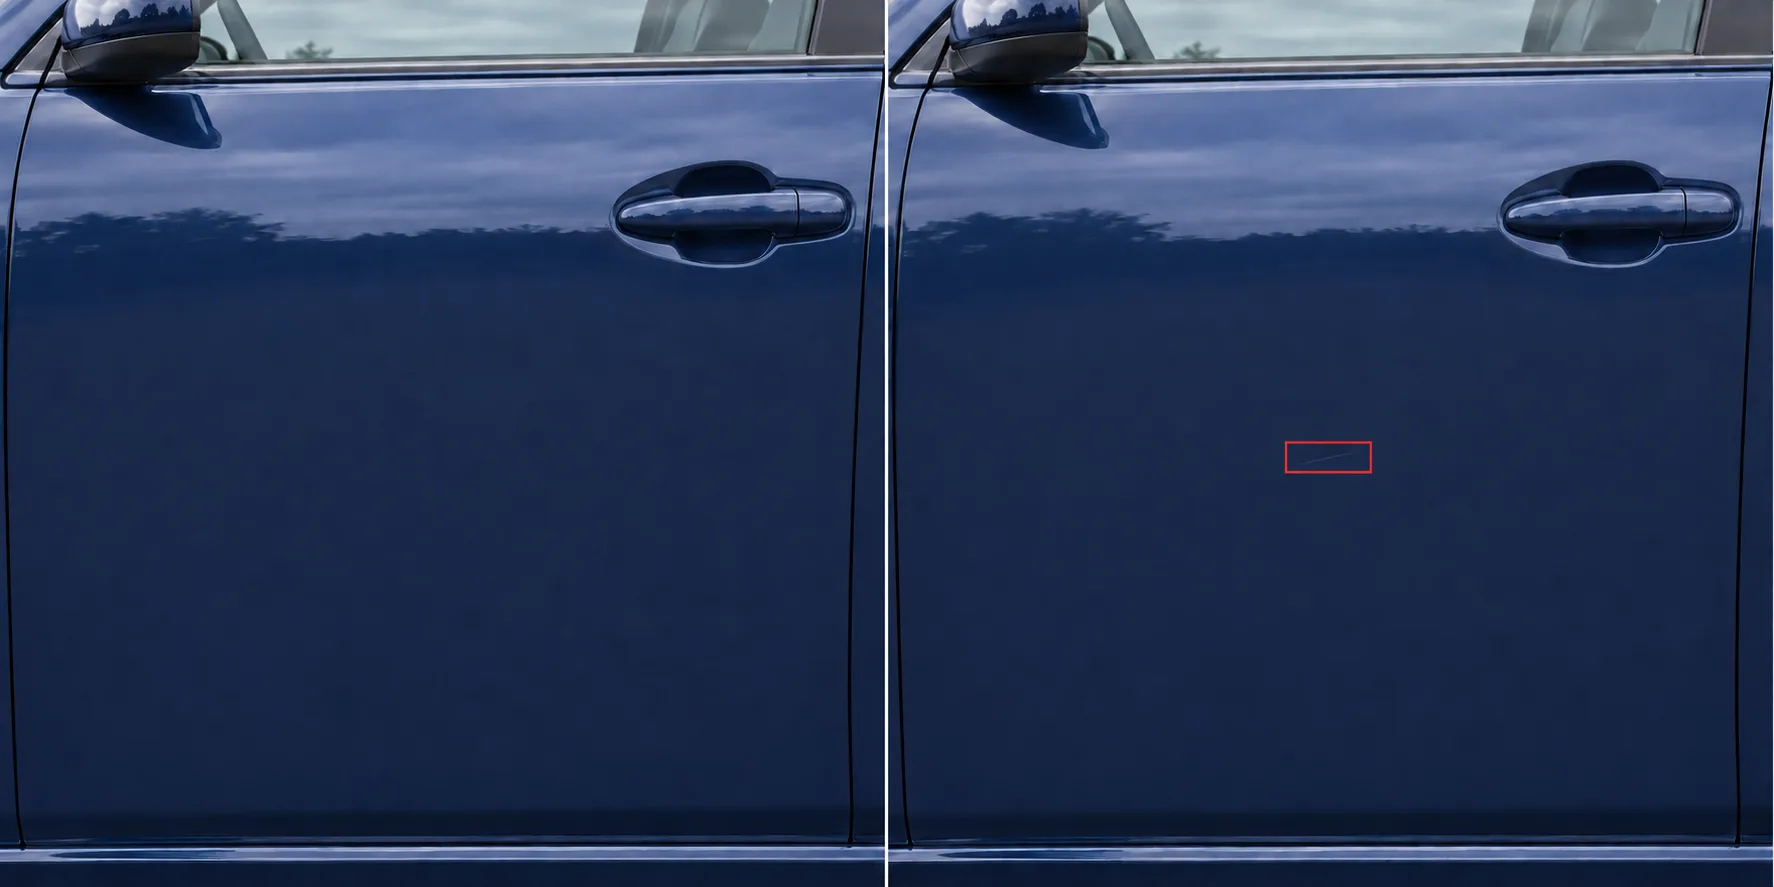
Let’s say we have a car hire firm that wants to check whether a car has been returned in the same condition as when the customer first hired it. We can use JEV to spot tiny differences, e.g. slight dents and scratches to the bodywork.
Consider these two images of a car door. The first image is pristine, and the second has a very faint horizontal scratch about halfway down.
 AI-generated pristine car door
 AI-generated slight scratch
Let’s run them through JEV image processing. Here’s the code that asks JEV to compare the two car-door photographs for visible differences, check whether a new scratch is present and locate it with a bounding box. It prints the probabilities and box confidence, then draws, saves and displays a red rectangle around the scratch if its probability is at least 80% and the box confidence is at least 70%; otherwise, it reports uncertainty.
Here are my outputs.
 Image by Author
Depending on how different the images are, you may need to tweak the various probability thresholds to get the output you want.
Summary
JEV’s image capabilities give us a practical way to turn visual assessments into decisions our software can act on. We can classify an image against reference photographs, score a particular quality, check whether something is present, or locate it using the new Box primitive.
I was particularly impressed by the “spot the difference” example. I know I’m getting on a bit, but that scratch was pretty hard for me to see — even when I knew where it was!
My four examples offer only a small window into the opportunities JEV image processing can provide. Similar approaches could support use cases such as equipment inspections, retail shelf monitoring, crop damage and manufacturing quality checks.
Importantly, the application still controls what happens next. A probability or confidence value can determine whether to accept an image, request another photograph or send a case for manual inspection.
For those interested, here is the link to my previous TDS article on OpenAI’s Decisions API that I mentioned at the start.