How to Manage Python Environments with uv Instead of venv
Learn how uv simplifies Python environment management compared to venv and pip, with faster dependency resolution, lockfiles, and project workflow tools in one.

Picture this: you spend hours developing the math for a problem you are trying to solve; you write code; your code works; you feel great; you share the code with your colleagues; and your dependencies don’t work.
How many times have we heard (or said) “but it works on my laptop!”? I’m going to take a wild guess and assume more than once. Even if you wrote the code, a couple of months later the project that worked perfectly last time you ran it might now fail on import. You install the missing package, and something else breaks. You update a library for a new project, only to discover that an older project depends on the previous version.
Suddenly, you’re debugging your Python installation instead of solving the problem you originally sat down to solve. Environment problems take far more time than programmers care to admit.
Python’s flexibility makes it easy to install libraries and start experimenting. But as soon as you work on multiple projects or want to share your projects with others, dependency management becomes a problem of its own.
I know what you are thinking… But Python already provides a solution: “virtual environments”! And I agree: venvs are great, but maintaining them isn’t always fun, which is why a tool like uv makes managing them much easier.
A Step Back
Let’s start with the underlying problem, build two isolated Python projects, and explore what changes when we move from venv and pip to uv.
Imagine you’re working on two data science projects. Project A uses an older version of pandas because its analysis pipeline depends on that version, while Project B uses a newer version to take advantage of recently introduced features.
A common problem for newer and mid-level developers is that if both projects share the same package installation, upgrading pandas for Project B can break Project A.
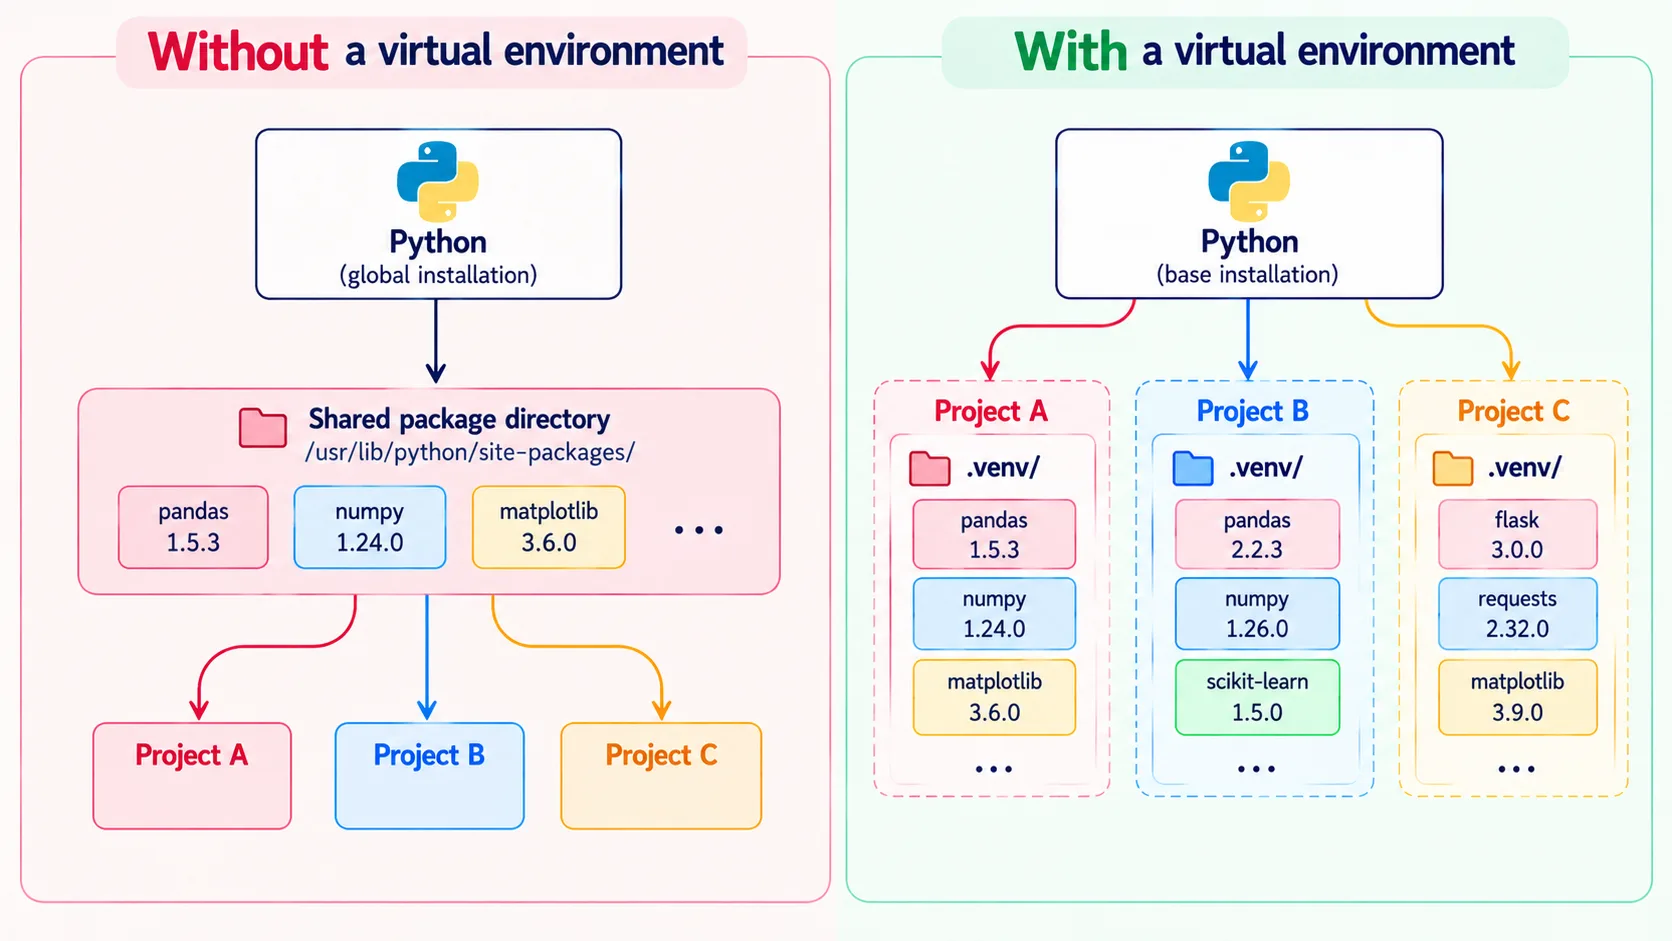
The difference here is that a virtual environment doesn’t necessarily install an entirely independent operating system or Python runtime. It isolates the project’s Python packages and execution context while using an underlying Python installation.
This is extremely useful — dare I say, essential — for data science, machine learning, web development, and research projects. Now that you are convinced venvs matter, let’s talk about why uv is a must-use in new workflows.
venv vs uv
venv + pip
When you download Python, it usually comes with venv, a standard-library module for creating virtual environments. It is very convenient, so let’s create a small project that uses it.
Step 1: Create the project
Create a new directory for your project and navigate into it.
Step 2: Create a virtual environment
python -m venv .venvOn some systems, you may need to use python3 instead of python. This creates a .venv directory containing the environment’s Python executable and supporting files.
The name .venv is a convention, not a requirement. It’s simply a recognizable name that many Python tools and code editors understand.
Step 3: Activate the environment
On macOS or Linux:
source .venv/bin/activateOn Windows PowerShell:
.venv\Scripts\Activate.ps1Your terminal will typically show (.venv) in the prompt.
Now install pandas:
pip install pandasYou can check which Python executable you’re using:
which pythonThe path should point to the Python executable inside .venv.
Step 4: Run some Python code
Create a file named main.py and run it:
python main.pyThat’s it. You have a Python project with its own environment and dependencies.
But now imagine sending the project to a colleague. Your code is there, but the environment isn’t. How do they recreate your environment?
Step 5: Record the dependencies
You can export the installed packages to a requirements.txt file:
pip freeze > requirements.txtAnother developer can create an environment, activate it, and install those packages:
pip install -r requirements.txtThat workflow looks valid; you can even add package versions in your requirements.txt file. The issue is that you have to manage several steps yourself: creating the environment, installing dependencies, recording package versions, and keeping the dependency file up to date. That’s a lot to manage, and it requires maintenance from the person who wrote the code in the first place.
And recording installed packages is not the same as guaranteeing that every aspect of a project will behave identically on every machine.
Can Two Projects Use Different pandas Versions?
Let’s test the central idea behind virtual environments. We’ll create two small projects — one using pandas 2.2.3 and the other using pandas 2.3.3. These are illustrative pinned versions for this experiment, not recommendations for new production projects.
First, create two directories:
mkdir project_a project_bIn each directory, create a separate environment:
python -m venv project_a/.venv
python -m venv project_b/.venv
Install a different pandas version in each environment.
On macOS or Linux:
project_a/.venv/bin/pip install "pandas==2.2.3"
project_b/.venv/bin/pip install "pandas==2.3.3"
On Windows, use the corresponding executable paths.
Now check the installed versions:
project_a/.venv/bin/python -c "import pandas; print(pandas.__version__)"
project_b/.venv/bin/python -c "import pandas; print(pandas.__version__)"
Each command should print the version installed in its respective environment, assuming the installation succeeds for your Python version and platform. This demonstrates how two projects can maintain different dependencies without overwriting one another’s installations.
Manually creating environments and managing dependencies isn’t the only way — dare I say, it is the more tedious way. So, what is the efficient way to manage dependencies?
Enter uv
uv is a Python package and project management tool developed by Astral. It can create virtual environments, install packages, manage Python versions, resolve dependencies, maintain lockfiles, and run commands in a project’s environment — all with a single tool. This makes it faster and far more efficient than manually managing your own environments.
Let’s recreate our project with uv and see how much simpler it is.
Step 1: Initialize the project
uv init --bare my-project
cd my-project
The --bare option creates a minimal project configuration, keeping the example simple so we can create main.py ourselves.
Step 2: Add a dependency
uv add pandasThis adds pandas to the project’s dependencies in pyproject.toml, resolves the dependencies, and updates the project’s lockfile and environment.
The project directory will now contain:
.venv/— the project’s virtual environmentpyproject.toml— the project’s metadata, configuration, and declared dependenciesuv.lock— the resolved dependency information used to reproduce the project’s environment
The key difference is that uv manages these pieces as part of the project workflow for you.
Step 3: Run the project
Create the same main.py file from the previous example, then run:
uv run main.pyuv run checks that the project lockfile and environment are in sync before running the command, unless you explicitly disable that behavior. You can still activate .venv if you prefer, but the point here is that you don’t have to.
Step 4: Recreate the environment
Imagine cloning this project on another computer. The repository contains both pyproject.toml and uv.lock. Run:
uv syncThis synchronizes the environment with the project’s dependencies and creates a .venv if one doesn’t exist.
venv vs uv: What’s Actually Different?
It’s tempting to compare these tools as direct competitors, but they aren’t quite the same. venv creates virtual environments. pip installs packages. uv brings environment creation, dependency management, Python version management, and project execution into one tool.
You might be wondering: Which one should I use?
The truth is, there is no single right answer — it depends on your situation.
Use venv + pip when:
- You’re learning Python and want to understand the fundamentals.
- You’re following a tutorial that uses
requirements.txt. - You’re maintaining a small script with a few dependencies.
- You’re working in an environment where installing extra tools isn’t practical.
Use uv when:
- You regularly start new Python projects.
- You want dependency resolution and lockfiles in one workflow.
- You frequently switch between projects.
- You need to manage different Python versions.
- You want a straightforward way to synchronize dependencies across machines.
You can also adopt uv for an existing project, but don’t assume migration is automatic or risk-free — legacy dependency constraints and project configuration will still need to be tested.
Final Thoughts
Virtual environments solve a deceptively simple problem: keeping one project’s dependencies from interfering with another’s. The traditional venv + pip workflow remains useful, and understanding it gives you a solid foundation. uv builds on that foundation by making environment creation, dependency resolution, locking, and execution feel like parts of the same process.
The recommendation is to learn the fundamentals, then try uv on your next small project. You don’t need to switch every repository overnight. The goal isn’t to collect Python tools — it’s to spend less time repairing your environment and more time solving the problem you opened Python to solve.